Basic description of the method used, first, decide on which Model is to be produced and at what size.
Give due regard to your lifting and carrying capacities, the size of the vehicle which the finished boat will be travelling in, and the cost of making the boat.
A lines plan of the Model at the correct size is needed, I scaled mine up from a small plan in a reputable book.
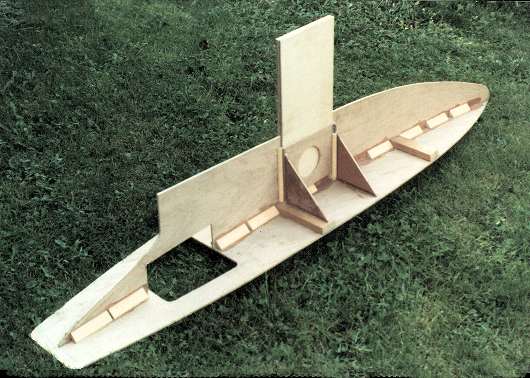
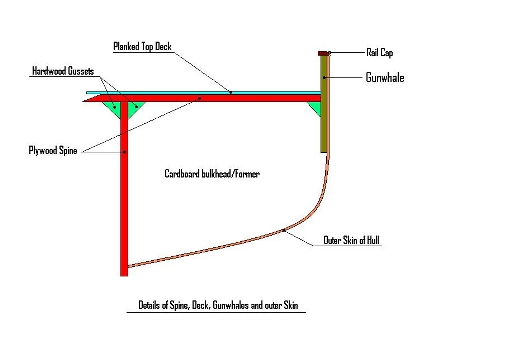
The Side Elevation of the Hull, up to the Deck level, is made of Plywood, as is the Plan of the Deck.
These two Ply parts are joined on the Centre Line, to make a T , with the curved Sheer of the Deck, at the top.
The bottom of the T will be the Keel of the Hull, so must be of the correct thickness where it protrudes out of the Hull, this part can be made thicker later in the build.
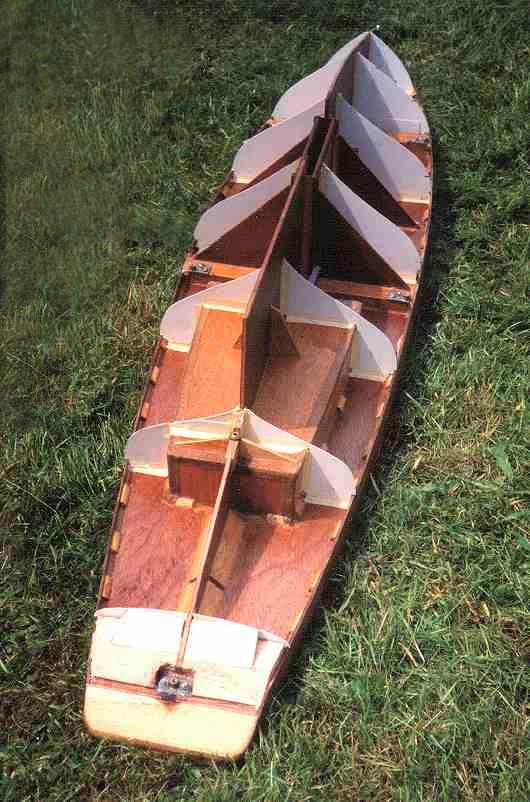
This unit is now to be fitted with Cardboard Frames, as if the Hull was going to be Planked, glue them into position as normal.
There will be NO planks!, the empty spaces between the Frames and the Centre panel and the bottom of the Deck, is to be filled with Foam Blocks cut to shape and glued into position.
Fill ALL the spaces in the Hull with Foam blocks, glue them all in.
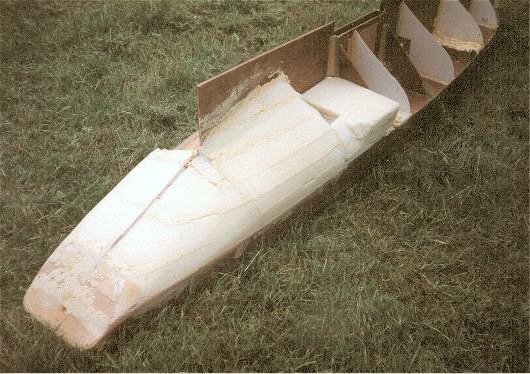
The OUTER edges of the Foam Blocks are then cut and sanded down to the edges of the Frames, the Deck and the Centre panel.
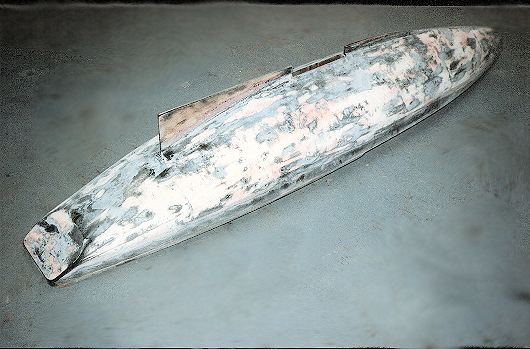
The whole of the Hull is then smoothed over with Filler and sanded down, only a thin layer of Filler is needed, because now is the time to Fibre-glass the Hull.
Carbon, Glass, Kevlar what ever takes your fancy, but, be very neat when doing it, remember, this is the OUTSIDE of the Hull you are working on.
Because of the Foam on the inside of the hull only a thin layer of Carbon/ Glass is needed to produce a very strong Hull.
Inside the Hull is the Ply-wood centre T, my Schooner Hull is only about 1/16th inch thick, but there are no loads placed onto the Hull, rigging loads, Mast downloads, all go through the Centre T, not the outer skin, the skin only keeps the water out, IF water does get in, it has nowhere to go, because the Hull is full of Foam!.
The advantages of this method is that you end up sailing what otherwise would be a Fibre Glass Plug!.
The construction is considerably stronger than a Fibre Glass boat, because there is almost no stress on the Hull its self.
The Hull will be slightly heavier than a normal Fibre Glass one, but not by much, because there are no Bulk heads or Frames present.
The disadvantages of this method are, there is no way into the Hull when it is finished, without Major Surgery.
ALL the R/C spaces have to pre planned before the Hull is finished, no way to fit another Nicad etc, if the space you allowed is too small, it can be made bigger, but is much more work.
But not as much work as doing the normal way with Fibre Glass, Male Plug, Female Mould, finished Hull, then fit out the Hull with Frames, Deck etc.
Wood and Foam
The Plywood to use should be Multi-ply not the cheap 3 ply, with rough outer surfaces.
In the UK we have Birch Faced Ply this ply is Furniture quality, smooth surfaced, fine grained, and very well made.
Bluenose has a 6 foot long hull and used ¼ inch Birch Faced Ply.
The two pieces of ply that make up the T shaped spine of the hull are very strong when joined together, there is no need to use much thicker ply, unless you are building a 12 foot long hull, then use ½ inch!.
The Foam MUST be resistant to the Resin used.
Ordinary white polystyrene foam melts on contact with Resin, it can be used IF it is painted with Emulsion Paint, it has to be sealed with the paint 100%, or the resin will get in and melt it.
Much better to use Foam that does not melt, Builders use a Blue Foam, in different grades for use in walls and floors, there is also a Pink one too.
The Blue Foam is used in model aero plane wings and fuselages.
Use of Epoxy resins may be easier, I used Polyester, 26 years ago Epoxy was very expensive.
Test the foam with the Resin you are going to use, there must be NO reaction between the two, if the Foam melts, even a tiny bit, dont use it, find another.
Foam and Glue
I have scanned some photos taken as the Schooner was being made.
Not exactly step by step, but will show how the various parts were fitted together.
 |
 |
 |
A full roll of film, 36 exposures, was taken at the time, but alas was lost, it never did turn up!, so some imagination has to be used to fill in the gaps.
 |
 |
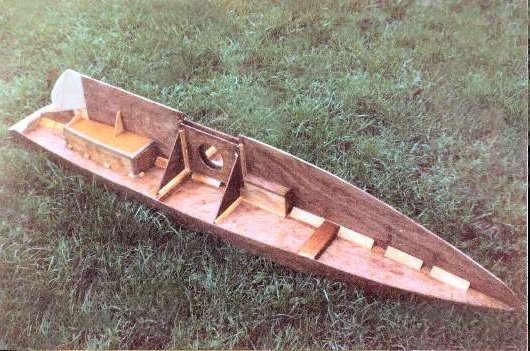
The Foam used was rigid, but rather crumbly to touch, quite strong in compression and not affected at all by the Resin. Small cubes of the foam were placed in a glass jar, the jar was then filled with resin and left for about a week.When the cubes were removed they showed no signs of breakdown at all. |
| The foam was “glued ” in place in the hull with an expanding foam in an aerosol can, house builders use it to fill gaps in walls etc.Problem with the expanding foam was it kept on expanding!, the Blocks of foam had to be held in place while the “glue” foam set and stopped doing its thing. I think Silicon Sealant would have been a better choice, the expanding stuff was OK to fill any gaps.Fitting the rigid foam into the Hull was very easy, a large hand Saw, to do all the straight cuts, then glue them into position, then a Carving Knife was used, to cut almost down to the Formers. Then a long flexy Sanding Block, quickly shaped the foam down to the Card board Formers. The outer edges of the card board formers were the same colour as the rigid foam, so they were painted bright Orange, they could then be easily seen when sanding was being done.The Hull quickly sanded to the correct shape. A thin layer of soft Filler was applied, all over the foam surface, this was sanded down to the formers painted edges, any small gaps were also filled in. |
 |
 |
 |
Glass Cloth and Resin
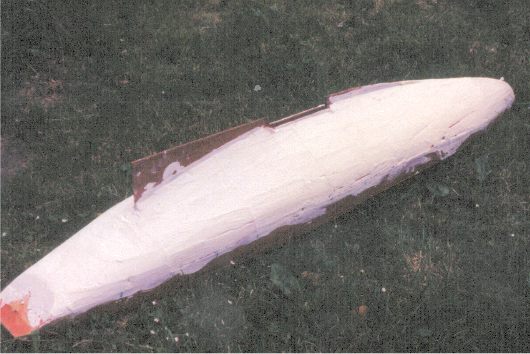
The woven Glass cloth was very carefully cut to fit the Hull with no over lapping, or as little as possible and sewn into position, to give a single layer all over the hull.
The Cloth was very thin and had to form a skin over the rigid foam and the Filler.
Resin was applied and allowed to cure.
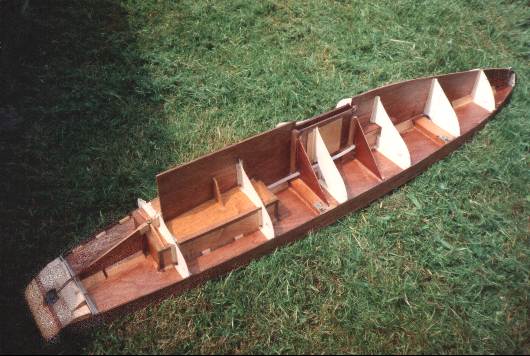
| A layer of much heavier cloth was cut and formed to fit the hull, again with no overlaps and was copied to give two layers. These two layers were applied with resin and allowed to cure. When the resin had cured the hull was sanded again, this time the outer part of the Formers in the hull were used.The cardboard formers were cut from a sheet of Card, the inner ones were used inside the hull, the outer ones were cut to allow for the thickness of the skin, and used to check the shape of the nearly finished Hull. The position of the formers had been marked onto the Central Spine, to enable the outer formers to check the shape as the Hull was being formed. |
 |
 |
Some sanding was needed, but not much, but,where the cloth had been sanded, there were rough edges, so a final layer of the very thin cloth was then applied with resin and allowed to cure. A thin layer of filler, a harder one this time, was laid over the glass cloth and sanded down to shape using the outer formers as a guide.A very thin coat of paint was sprayed over the hull, sanding this layer of paint,with the long sanding block, to try and remove it all, showed up any hollows in the hull form. These hollows were filled with the filler, then another thin coat of paint was sprayed on, this time a different colour!. This new coat was sanded, to try to remove it all, any hollows showing were filled as before. All the time the outer, card board formers were used to keep the lines of the hull correct. |
Only when a coat of paint can be competely removed by sanding, should the final colour coats be applied.
Deck Fittings and Cabins
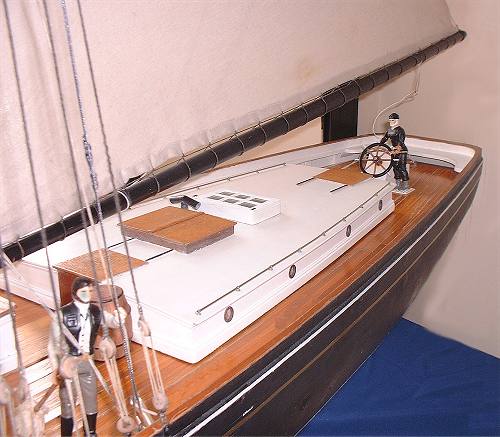
The Deck and its planking was constructed on a piece of thin high quality Plywood.
Schooner Decks usually are in two levels, the Aft section is higher from the Great Beam, which is just forward of the main Mast.
The Ply deck is held into place with the Mast Steps and the Shroud anchor points and could be removed in case of damage or decay.
Fit the Ply decks to the boat, then remove them to enable an easy job to be done of the Planking, no working on the boat at all!.
.
The Planking of the deck MUST be done as near to Scale as possible, this is one area that comes under a lot of scrutiny from viewers.
If a plank does not fit, scrap it! make another one, it is on view all the time the boat is on shore.
 |
 |
 |
Try to find out what sort of wood was used for the Deck, if the Original boat used Pine, do NOT make yours with Mahogany, just because it “looks better”, you may as well paint the Hull pink!.
Most of the Grand Banks Schooners were built on river banks, out in the open, they were working boats, NOT Grand Piano’s!.
Even so, they were very carefully crafted, mens lives depended upon the skill of the Shipbuilders, but high gloss finishes were hard to find.
The Cabins were usually Painted white, as were most things on deck that could be bumped into, on a dark Moonless night.
This enables the model Cabins to be made from Plywood, with Pine planking on the roofs where required.
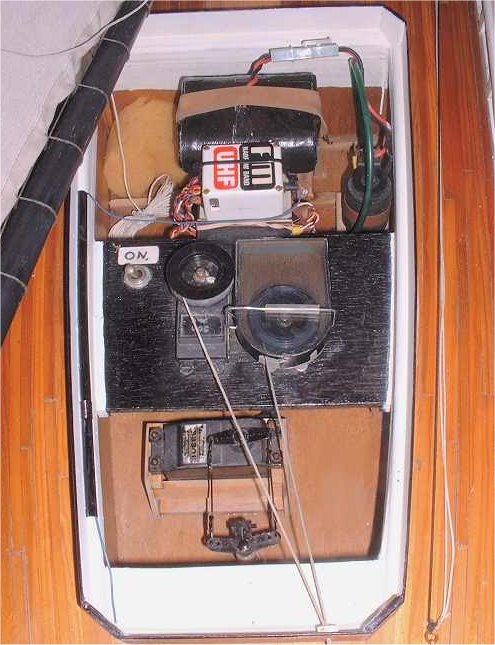
The sides of the Cabins on Bluenose are about one inch high, an inch high box was built onto the deck, which was a tight fit inside the Cabin.
The Cabin was then placed over the deck box, and became a Box Lid !, tight fitting, but removable for access to the Radio gear.
The Hull cutout under the Cabin then had a double, one inch high wall all around its edges, this was to prevent water from entering the Hull and damaging the Radio gear.
The large Main Cabin also has a Bilge Pump fitted, to get rid of any water that may get into the Radio area.
The pump is automatic, two contacts, when wet, start the pump, the water goes up a plastic pipe, which discharges the water out of the Galley smoke Stack!.
Water is definately “Not needed on Voyage!”.
The Rigging Section.
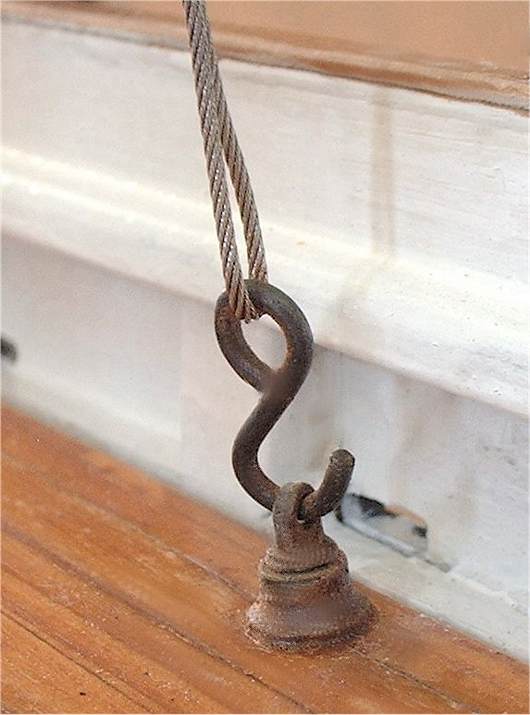
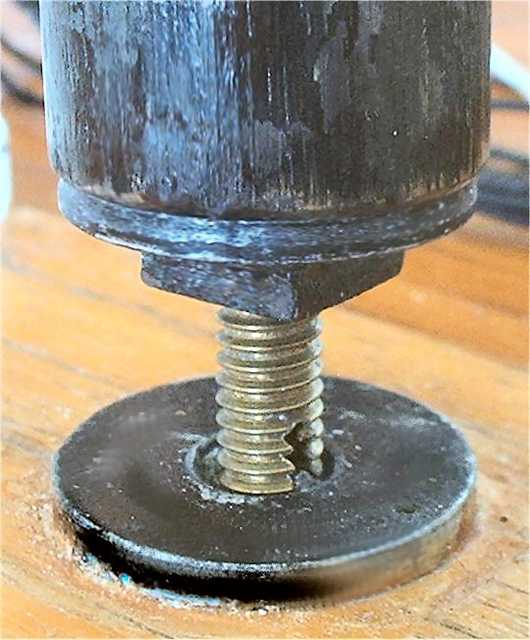 The Masts are Deck stepped, fitting onto an alloy plate fastened to the Deck, both Masts are jacked up to tension the main rigging, which is of fixed lengths of Stainless Steel cable. The Masts are Deck stepped, fitting onto an alloy plate fastened to the Deck, both Masts are jacked up to tension the main rigging, which is of fixed lengths of Stainless Steel cable.The main rigging is NOT adjustable, the only “fine tuning” that is available, are the Eyebolts that go through the Deck, they can be raised or lowered, but not by much. The Stainless cable is placed around the Mast, the metal Crimps used to fasten it are tightened just enough to allow the cable length to be set up with both Masts in line, then the Crimps are finally tightened fully. |
 All the Booms were made using the same type of Fibre Glass tapered tubes, epoxied together, with Scale wooden ends fitted into place. All the Booms were made using the same type of Fibre Glass tapered tubes, epoxied together, with Scale wooden ends fitted into place.The only Boom which is all wood, is the Main Boom, at nearly 40 inches long, the Fibre Glass tubes were just not strong enough. The Main Boom was made from the same Hardwood used for the two Masts, Ramin, which is very strong. At 3/4 inch diameter in the middle, it tapers to each end, yet the top edge has to remain straight!, not easy to do!. It was all marked out, with centre lines, then and slowly hand planed and sanded to shape. Sailing in very strong winds, it can be seen to be bending!. |
The Running Rigging.
All of the Standing rigging, that is, rigging holding up the Masts and Bowsprit, is Stainless Steel Cable
Do not under estimate the power of the Wind!, I did, and had the Masts in the water many times!, not funny, with a crowd of people watching
Because the Main Boom extends over the stern of the boat, there can be no Backstay, to resist the masts forward motion.
The main shrouds have to be moved about 4 inches to the rear of the Main Mast, to hold the Rig upright
Not Scale!! I know, but there is NO Crew to hook/unhook the Rear Preventers, which, full Size, go aft, to near the Wheel house.
These Rear Preventers, 2 of them, had to be hooked/ unhooked as the Main Boom swung over the Wheelhouse during a Tack.
ONE of the two was always connected, otherwise the whole Rig would fall forwards and be lost!.
Not recommended out on the Grand Banks, even more so, if you cannot swim!.
 |
 |
 |
The Rear Shrouds were moved aft of the masts 4 inches, any further aft and the Main Boom movement is limited too much by them, when running before the wind.
The rear shrouds are now doing the function of the rear preventers, but they are much nearer to the base of the Main Mast, than they should be.
This puts a tremendous load on them!.
At first 40kg cable were used, it snapped in a light breeze! red face!, then 80kg was used, that snapped too, more red!.
Got mad at it, 4 cables 140kgs each were fitted, all was well!, until, after loads of sailing, they snapped too, worn out!.
My fault, sailed the boat in a high wind, but failed to check everything first!.
As I said earlier, do not under estimate the power of the Wind!.
The rigging between the Masts and on the Bowsprit, is all 80kg breaking strain, maybe too strong, but it cuts down on breakages.
The rest of the standing rigging, foot ropes etc is all fake, no loads are placed on any of it.
At the moment, there is fake rigging which is missing, having been damaged, but who can see it, when the boat is belting along out in a windy Lake?.
THE RIGGING on a sailing boat is the heart and soul of the boat.
The boat lives or dies depending on the quality and strength of the Rigging.
If the Rigging is well made and is dependable, it will give the Owner the confidence to sail out into a wide expanse of water, without worrying about the safety of the boat.
Sailing out like this also impresses ordinary folk, who, watching the boat sailing far away, often ask, “Are you not worried about the boat being so far out?”.
Not if the Rigging is up to the Job!.
I suppose it IS possible to “over rig” a boat, if so, I don’t know how to do it!.
Years ago, it was the Radio that was the weak link, with recent Tech advances it is now almost taken for granted that the Radio will work OK.
So what is most likely to go wrong with a sailing yacht? , it is the Rigging!.
A simple test – – lay the fully rigged boat on its side, get hold of the TOP of the Mast and lift up the boat, until it is standing upright on its Keel.
Anything break?, if not, bring the Mast down to about 45 degrees and give the whole boat a real good shaking up and down, holding onto the top of the Mast !!.
Anything break? – – – no?, you are almost there !!.
You have just simulated sailing in a Storm!, best part is, the boat is still in your hands, NOT in the middle of a big windy Lake.
When you were building your boat, it was perfectly level and perfectly still, no forces from side to side, or fore and aft, in fact it did not know it was a boat, until you put it into the water and gave it a push.
THEN, the Wind got at it!, the Wind has no cares about how accurate you were with building the boat, about the correct colours you used, or all the small details, the Wind wants to SMASH your boat and its not bothered how it does it either!.
This now is the start of all out War! .
RIGGING LINES
Smaller Scale boats, up to 40 inches long will still need strong rigging line, such as Dacron, which can be bought from the Kite shops.
The line must not stretch, lots of fishing lines do stretch, so be very sure when buying line, to ask if it stretches.
Bigger Scale boats can use fishing Trace Wire, it is usually Nylon covered and is available in very many strengths, do not underestimate the strength of wire required.
The Nylon covering on the Trace Wire magnifies the actual wire size, so it looks a lot stronger than it is, use the breaking strain figures, dont let your eyes fool you.
The Trace Wire is joined with metal Crimps, which are easy to use and fit.
I initially rigged Bluenose using 40 Kg wire, it snapped first time out!, she now sails with 80 and 100Kg wire which lasts a fair time – – BUT, it does snap!!.
If the shiny finish on the Trace Wire is not to your liking, use a Waterproof Marker Pen to colour the line to your liking, the same can be done to the Dacron line too.
RIGGING POINTS
Where the rigging is connected to the Deck, Masts and the Booms needs careful attention to ensure the points are strong enough.
It is no use having very strong rigging lines if the attachments are too weak.
ALL hooks must be made from Piano Wire which is the spring Steel Wire used for Model Aircraft under carriages.
About 1/16 inch diameter should be big enough, larger if the boat is very big.
Bending this wire takes some practice, use good pliers and wear some goggles, just to be safe!.
Make the Hooks long enough to prevent the Wind from shaking them off should anything come loose while sailing, better to loose the sail settings than the whole Rig.
Rigging a Scale boat so that the rigging is correct to Scale, is rather hard to do.
Model boats do NOT have a Crew to change the ropes and rigging while the boat is sailing.
Rig the boat so that everything works – – – just like the real boat, even though some of the rigging has to be placed slightly out of Scale.
Main Booms and Backstays often cause huge problems, in real Life the Crew would sort things out, but on a Scale model, there is no Crew.
The Backstays on Bluenose had to be moved to 4 inches behind the Main Mast, because the Main Boom extends out over the Stern of the boat.
With the Backstays in the correct place, the model could not Tack into the Wind.
The object is to get the model boat sailing just like the real boat, so some sacrifices just have to be made.
If the model boat sails and responds like the real boat did, no one will notice, even if they did, when you explain why the changes were made, it will be understood.
The Sails
The sails were made from ordinary white Cotton sheet, bought at the local Market.
The cotton cloth was soaked in clean, cold water, then hung out to dry naturally, this was done many times to help prevent the Cotton from shrinking later.
The sails were marked out onto the dry, shrunken cloth, taking great care to keep the selve-edge of the cloth to the Leech edge of the Sail.
The Selve-edge is the “Long side” of a piece of cloth, usually there is a woven “seam” which can be used as the sail edge.
With the cloth cut in this manner, it gives the Sail a lot of strength.
Cotton Sails MUST be sewn with Cotton thread, as the sail expands and shrinks, the cotton thread does the same, stops the seams from wrinkling.
There are some very special Knots used to fasten the Sails to the Booms and Mast Bands, look them up and use them, they really work well.
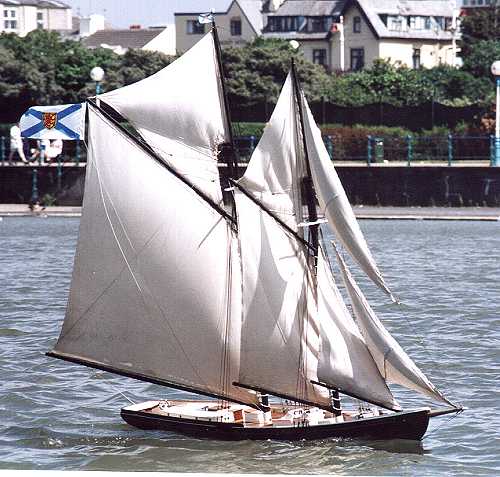
Nothing has ever been put onto the sails on Bluenose, except the water in which she has sailed in, over the years the sails have gone from white, to a light Tan colour, folk who have seen the real Bluenose have said the sails are now the correct colour!.
The nearest colour Dye to use on new sails, is called “Light Oak Tan” if you wish your sails to look old, from new!.
But, if they darken with age, what then? , a case of “buyer beware”.
I have seen photos of Schooner sails with patches in them, not too keen on doing that on a model, full size, maybe, to get the boat back to port!.Sewing the scale Seams into the sails, often gives a Quilted look, which I think is out of scale.
Some builders draw lines onto the sails to represent the sewing seams, but it has to be very carefully done, to make them look correct.
I took the easy way out- and left the sails plain, to date no body has ever commented on the lack of seams.
Conclusion
If you have read all of the previous pages, it will now be obvious that starting to build a large and complex Schooner from scratch, is a long and arduous task.
That should not deter you from doing it!, the rewards are immense and long lasting. The new Skills learned during building the Boat will be too numerous to list and will last you for a lifetime.
There is a lifetime of sailing your new Schooner, my Schooner is now 26 Years old!, can you imagine the enjoyment and satisfaction of owning and sailing her for all those years!.
No, I have never been bored, or fed up, not once!.
Would I build another one?, – – – no need to, I already have one!!!!!.

Oh,
P.S. Measure the car — FIRST !!
John.
*********************************************